Early Testing, Hiccups and Tweaks
Getting the module back in is just as easy as taking it out, once you've got the hang of it. Now that there are two pop-riveted posts at the back, you can use those to gently ease the module back into its socket with your thumbs. If you don't get the module back in quite right when you try to start up the power LED will light, then fade off again as you let go of the button, with no signs of life from the computer. I didn't find this documented anywhere, but it's good to know, as it had me worried for a while. When you're doing modifications like this, that startup chime is a wonderful thing to hear.
At my request, Steve had overclocked my processor module to Dual 1.58GHz. It's not a speed that he'd tried before, as his dual 1.25GHz module wouldn't start when overclocked that high, but I thought it was worth a shot anyway. It ran very well on the test machine, getting some wonderful benchmarks with an ATI FireGL X3!
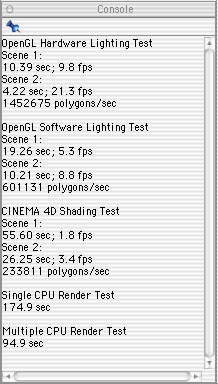
The results above show that it ran really well on my setup too. For a while. Unfortunately, after some considerable testing, the speed proved to be unstable. The system was set up as 1.58GHz @ 1.60V, but after a while of testing the second processor would lock up and stop responding, leaving processor 0 on it's own. The foreground app would crash out, but everything else would keep going on the one processor - remarkable, really, that OS X could survive something as catastrophic as that.
I then took up the soldering iron myself, with some trepidation, and increased the voltage from 1.60V to 1.65V. This actually made a world of difference, and I would say that the system became 98% stable after the voltage boost. Unfortunately, 98% reliability is useless when you're talking about processors, and still the second one would keep dropping out - sometimes randomly, sometimes lasting more than twenty Cinebench renders. Looking at the number of zero-ohm resistors to shift to get 1.675V or 1.70V, I decided to keep it simple and drop down to 1.50GHz. Take a look at the MDD Overclocking Guide for details, and then see Leo Bodnar's Mac mini Overclocking page for an example of what you're up against. Take particular note of the image on the end of the "look at the size of the resistors" link...
I practiced for some time on a dead Dell motherboard, which is now missing half of its parts. I found the easiest way was to heat both ends of the resistor with a 0.8mm tip 20W soldering iron for about a second, and then immediately return to the first solder joint, heat it and very gently ease it sideways. Once it is half-way off it's contact on the board, go back to the other side, apply the heat again and they tend to hop off the board and onto your iron. If you heat for too long, you'll burn out components. If you apply too much pressure, you'll rip off the pad on the board and you can say "bye-bye" to ever reconnecting that link again.
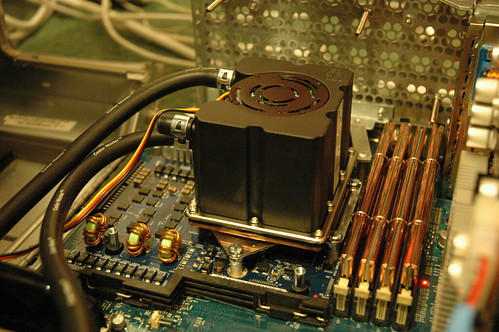
From the picture above you can also see that the blue rubber fan mounts have been replaced by bolts. I was too eager after the 1.65 'overvolting' and fitted the rear fans, only to have remove them again to clock down to dual 1.50GHz. I figured that I can create some fan gaskets instead, so I decided to make the fans easy to remove should the processor ever have to come out again. They are mounted as far to either side of the waterblock and pump as possible, hopefully to make the air pathway less cluttered.
Retesting and Temperatures >>